A Complete Guide to HP Smart Printer Setup on Your Device
Setting up a new HP Smart printer is interesting, especially when you are doing it for the first time. All it takes is a few steps to settle everything in place and make your printer work. You start by unboxing the printer and end up installing the printer drivers and software and then taking a print test. All the procedures should be done carefully so there will be no room for mistakes. Beginners especially should pay attention to all the steps carefully. Let’s get started with the HP Smart printer setup.
Step 1: Unbox Your HP Smart
Printer
So, the first step is to remove the printer from the package and reveal it. It involves some steps so that you don’t harm the printer and unbox it decently.
- As your initial step, take off the printer from the
box.
- Then, install the printer on a flat surface.
- Next, take off all the protective tapes from the
printer.
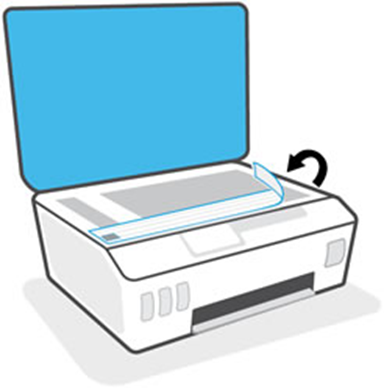
- Now, open the scanner lid and take off the protective tape.
- After that, you have to unlock the front door.

- Take off the tape and all the packaging materials in
the ink access area.

- Next, open the printhead access door and take off
the tape and packaging material from the printer.
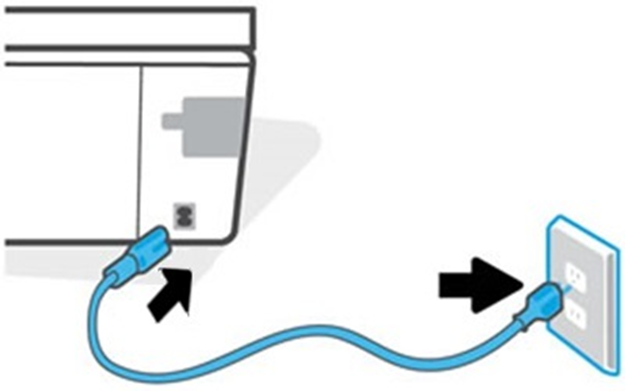
- Connect your power cord to the back side of the
printer and connect its other end to the power outlet.
- Switch on your printer and let your printer get idle
and stop before you start.
- For printers having a touchscreen control panel, you should follow the on-screen prompts.
By using these steps,
you can easily unbox your HP Smart printer. Let’s move ahead to the next step.
Step 2: Fill up the Ink
Tanks
In this step, you are required to fill the ink tanks included with your printer. So, for that, follow the given steps.
- Firstly, remove the cyan ink tank cap.

- Now, remove the lid of the cyan ink bottle. Do it
carefully to avoid breaking the lid.
- Then, move your bottle upside down, placing it over
the tank opening and gently pushing the bottle on the spout. Avoid
squeezing the bottle.
- Once your tank is filled, turn the bottle upright
and then close the lid of your ink bottle.
- Next, follow the previous step to fill all the other
ink tanks.
- Keep the leftover ink bottles in a safe, dry and
cool place.
- In the last step, close the front door.

Step 3: Place the Printheads
In the third step of the HP Smart printer setup, you will have to install the printheads that you got with your printer. So, follow the given methods.
- Open the front door and the printhead access door.
- Next, allow the carriage to stop before proceeding.
- Pull the plastic handle on the printhead packing
material.
- Then, gently press down the printhead latch to
reveal it.

- After that, remove the plastic and recycle it.
- Open the printhead packages and take out the
printheads.

- Next, lift the orange plugs to detach them from the
top of the printheads.
- Peel off the tape covering the printhead contact
using the pull tabs.
- Now, slide the printhead slightly upward into the
empty slot.
- Then, slowly push up on the printhead until it
clicks into place.
- Ensure the black printhead is inserted in the
correct slot and the tri-colour printhead in the left slot.
- Lastly, push down the blue carriage to secure everything.
Finally, you have
installed the printheads in their correct places. Let’s go ahead to the next
steps.
Step 4: Insert Paper and
Adjust Printheads
Now, you are required to insert the plain white paper in the input tray once you installed the printheads. So, follow the steps below for this.
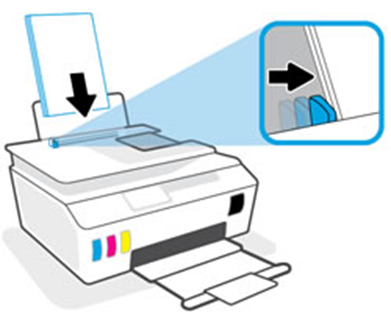
- Raise the input tray and expand the output tray.

- After that, move the paper guide to the left side.
- Insert a bundle of plain white paper inside the
input tray and move the paper guide touching it with the stack of paper.
- Lastly, adjust your printheads.
Finally, you have
inserted the plain paper and adjusted the printheads. And you are ready to
download and install your printer’s software.
Step 5: Get the Printer
Software
You have finally set up your printer’s hardware, and you are all set to install your printer’s software. Avoid connecting your printer to the computer until you have installed your software installation. Follow these steps to get HP drivers on your device.
- To get started, go to HP’s official website.
- As you are searching for the HP printer drivers,
click on the Printer option.
- Now, supply your printer’s name in the search area and click the Submit button.
- Pick the right package of drivers according to your
Windows system.
- After that, download that package to your printer.
- When the HP drivers are downloaded successfully, go
to the downloads folder.
- Then, double-click the downloaded file to extract
that.
- Next, go with all the on-screen instructions to
finish the setup process.
- At last, restart your computer operating system.
Congrats! You have
downloaded and installed the HP printer drivers and software successfully.
And also, the setup has
been done successfully.
Conclusion
Wrapping up the HP Smart printer setup, you understood
the right procedure to do that. The process starts with unboxing your printer
and then gently setting its parts like printhead and ink tanks. Then, load the
paper stack into the paper tray and move to download the printer drivers and
software. At last, you should take a print test to check the printer’s
functionality.
Visit: 123hp printer setup
Comments
Post a Comment